Monday, 12 August 2013

No More French Curves? Quoi?

Having spent the last 5 months attending evening classes with Toni Stalls at Integral-T and working through the Grafis Text book, which is freely downloadable from the Grafis website in pdf format here; I am confidently using the construction tools and I am not even half way through the manual or my lesson plan yet. There are 20 Chapters in the book, which means that give or take 2 chapters a month and it will take me a year to begin to know it! 

 This month I have been focusing on Curve Constructions and Transformations, which I have been using in a basic way with the Mirror at line tool and Turn with turn pointfrom point to point in previous pattern constructions, but it’s more complicated and interesting than that! So read on and find out how!
In the Curve menu there are 3 options, Create new curve, Replace curve and Manipulate curve. The curve line is defined by 2 types of points. Firstly Base Point and secondly the Auxiliary Points which have the following attributes respectively:

Base Points
Bound to points or lines, which is an important feature to remember because when grading a garment the same construction steps are used from size to size and this bound point will remain constant throughout the sizes.  Each curve line must have a minimum of 2 BP i.e. Start base point and Finish base point. Base points can move along the line they are bound to by being dragged freely along that line. Direction is set to the curve line at the BP and a BP is indicated by a little cross.
Auxiliary Points
Are not bound to the construction, they can be dragged freely if Adjustment is selected in the Curve construction submenu. The position is calculated relative to the ‘zero curve’ which sounds dauntingly like rocket science but the zero curve is displayed as a dashed line after direction is set on the BP and the AP are adjusted away from their original position. A top tip is that the fewer the AP on a curved line the smoother the line, just think of it like a fine gold chain that you are pinning and finding the desired and expected shape.
Lastly before doing a little exercise, points must have a minimum distance of 5mm between each point. And only AP should be deleted!

To practice I want to use the curve tool to make a yoke on the skirt front so, I call Skirt 20 and click the curve menu.  Select top button Create new curve and click centre front of the skirt, (start BP) then click your side seam, (finish BP) and this is where your direction arrow will point. Set Direction 90 degrees at CF and at the side seam I drag the angle to the desired position before right clicking out. The angle can be reset using Delete Direction on the Curve construction menu if you want to change it. Insert your Auxiliary points and if your style requires that you bind the AP to a construction for example a dart apex  click Bind Point, this means that the curve will intercept this point as it’s a construction point and be in the same position in all sizes. To reset this, unbind point!

Skirt Yoke - Set Direction on Base Points
Curves can be adjusted at a later stage, but I would use great discretion! But if it must be altered double clicking or <F12> the line will bring you back to the interactive area. Beware that it must be logical in the construction record and not impact daughter parts. (I’m not sure what will happen when you hit test run all parts, but it might not be a good result and you might get error messages).

A few more exercises to reinforce this knowledge were the construction of the shirt yoke on the back of Bodice 10, using exact measurements down CB and armhole. It also allowed me to experiment with binding points to the apex of the back shoulder dart.
Shirt Back with Yoke Bind Point to Dart Apex

The second example is of a bodice constructed with a princess line into the armhole and bust point, as well as a curve in the hip area beginning to look like a corset design line.
Princess Line and Curve Hem Shape
Then comes a straight skirt with a curve to create a back and front yoke, meeting at an angle of 90 degrees at the side seam, centre front and centre back lines.
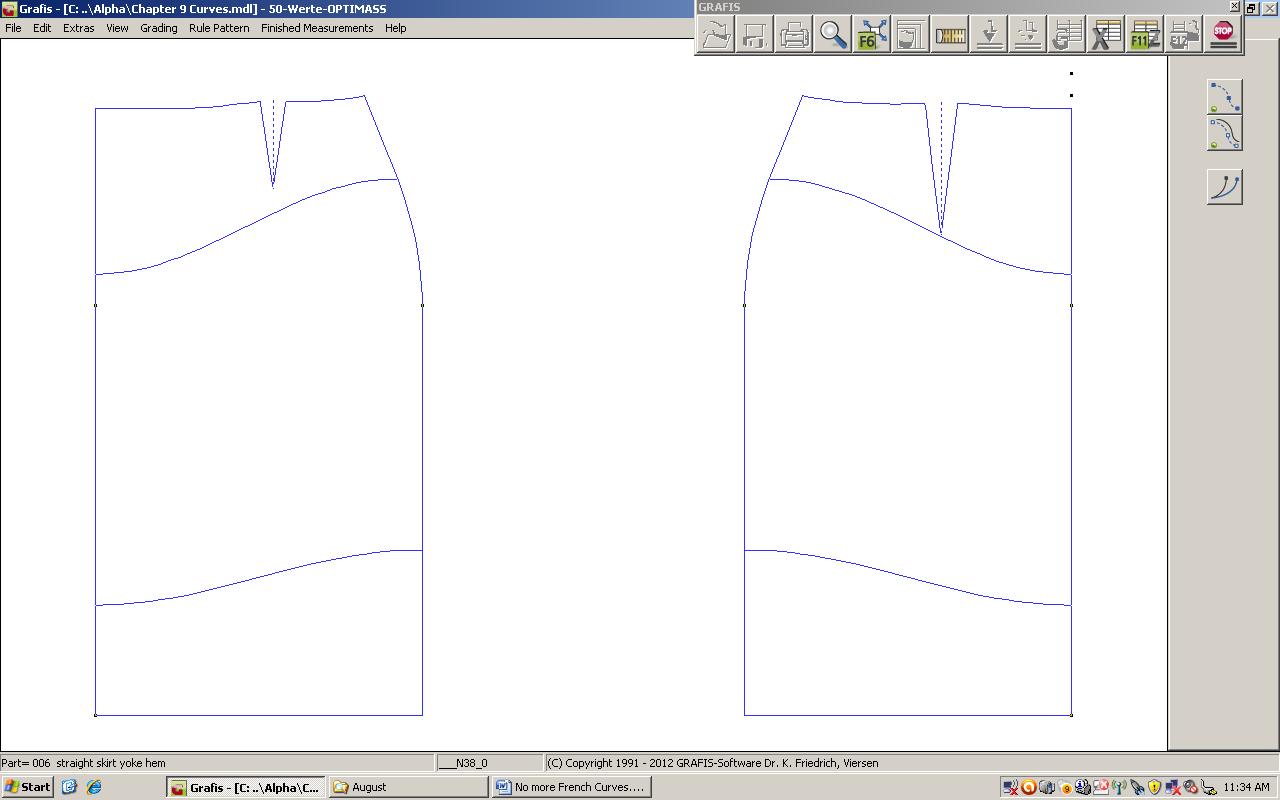
Straight Skirt with Curve Yoke and Hem
The construction of the yoke with the straight line from the shoulder was a little trickier than I had first anticipated, but with a few reset and trying again I managed to achieve the requirements of the exercise.
Yoke on Bodice with Straight Line Shoulder then Curve Neckline
The trousers are shortened and flared; the trouser leg is given a curvy hem and a curvy front trouser yoke. One of the last exercises using the curve menu in this way was a pocket construction, and then to change the pocket interactively into a jeans style pocket, by extending the curve into the centre front into the fly seam.

Trouser with Side Seam Flare & Perpendicular Inner Leg Seam

Trouser with Curvy Yoke and Hem

Trouser Pocket & Adaptation  to Jean Style Pocket 
The construction of the collar band is similar to flat pattern making of drafting a collar using measurements and joining the points. A series of measurements are given as per a block draft i.e. ½ neckline measurement, stand measurement, fall measure, roll line, break point etc much in the same manner connecting the points and setting the direction gives shape to the collar.

Collar Band

Wednesday, 10 July 2013

Darts, Pleats & Spread

This really is one of the first things I think of when making a pattern from a basic block; I find myself asking the question; Where do I put the dart? Can I ignore it completely? Can I incorporate it into a style line? But more often than not it needs to be relocated, shortened or reduced.  And this is where Grafis does just that.
Moving Dart around Bust Point
Under the Dart menu you can find the following options for relocating and shortening of darts as well as creating a dart hood. The tools are, the Dart Hood 10 Tool, Pinch 10 Tool and Pinch 20 Tool (the Pinch tools are very similar and so I’ve used them interchangeably, the difference is Pinch 20 creates a symmetry point (half the dart width on the baseline) as a perpendicular (90 ̊angle) line to the Apex (point of the dart) and the baseline (runs on the seam line) i.e. the dart lies at a 90 ̊angle to the seam with Pinch 20.
Pinch with New Dart
Grafis requires a closed perimeter to execute the dart tool, a starting and final point allowing a maximum gap of 0.5mm, however other individual lines need not be joined and in fact should be separated in the corner otherwise you get strange shapes for dart hoods happening. Obviously darts should not be closed with a dart hood if you want to relocate or reduce it, first remove the hood by deleting it. Finally before you start using the tools in the dart menu, make sure the dart lines are the same length and share an apex.
To get the dart to pivot in the direction that you want you need to select the dart lines in a specific order. So click relocate dart and determine the direction you want the dart to close in. Click the line that will move first, click the second line that will remain in its current location, next click on the point where the dart will relocate to, i.e. pitch point in armhole or into the side seam and relocate the dart. Remember to relocate the lines and points too!
Relocate Dart
The Relocate Dart Sub-menu allows you to determine what percentage of the dart you would like to move.  Enter the value i.e. 25% and the remainder of the dart is expressed beneath (rest=75%).  To accept this value click relocate automatic, with or without the dart line (+/-dartline). After relocating the dart it is important to move lines and points (This MUST be done directly after the dart has been moved). To do this use relocate additional…lines, points, +/-copy. There are reset buttons to step back if you have moved something accidentally.
Dart Relocated & Percentage of Dart Reallocated 
Shortening the dart is done by adjusting the shortening amount first and then clicking on the dart to be shortened. The construction of 5 pleats into the centre front of the bodice, with the relocation of the shoulder dart into these 5 Rastered points by 20% respectively was a great exercise to reinforce this knowledge, then to top it off the new darts had to be shortened by 20mm for the first 2 darts, 30mm for the third and fourth dart and 40mm for the fifth dart.
Percentage of Dart Reallocated & Shorten each Dart
Pinching with a new dart is also found in the darts menu, Pinch tool 10 and Pinch tool 20 with both tools the pinch amount and the curve is adjusted interactively. (I look forward to more practice with these handy tools, because they will take a lot of familiarity with their numerous points to master).  Once I created a new dart I had a practice with the Dart Hood 10 tool which has a couple of options on how to complete the dart, i.e. single dart hood or box pleat/ inverted pleat and pleat direction.
Hoods on Darts
Spreading for pleats and pivoting open and close follow on after the darts menu. Click Spread Line and Spread Line defined by two points. I found this easier after learning the method for dealing with darts. It follows the right hand principal and Grafis requires you to select the spread line before it will open the Spread Sub-menu allowing you to determine the width of the spread. With the practice exercises you must create a line using your Line tools, Parallel tool and/or Raster to map out the pleat/spread style lines. For example, construct spread line or points (start & finish) using points and lines menu, in basic menu click Spread – click Spread line or points, Spread submenu opens – click Redefine Spread line, enter spacing amount (+/-change direction swops the spread from one side to the other), Activate spread, single points lines, all.
Boot or Bell-bottom Leg Trouser
Yoke Front Skirt with Flare or Spread Skirt option
Spread with Point to Point in Blouse & Skirt Back
To end this chapter I made the Blouse with pin-tucks pattern, it’s a good exercise because it takes you back to basics and recaps all the tools that have been used in the previous chapters. Here is a quick step by step break down of how it’s done.
Call Basic block 10, make the following adjustments to achieve a Shirt Blouse shape. \
Under options
·         centre back fold
·         straight side seams (ss)
·         link hem direction at ss
·         4 segments (armhole)
Tolerance horizontal+vertical
·         bust 100mm
·         hip 100mm
·         across bust 15mm
·         across back 15mm
·         shoulder width 10mm
Bust dart
·         loosen armhole by 20mm
Shoulder dart
·         close
Neckline
·         increase by 5mm shoulder, CF & CB
Shoulder
·         relocate seam 10mm to the front
Shirt Blouse
For the development of the style, delete the waist darts, Auxiliary lines and points on CB. Link lines, hem + side seam, construct a co-ordinated corner in the side seam, with Corner 50 tool (120/80). Raster 6 buttons on the CF, 40mm from neckline, 75mm apart. Parallel lines from CF, 1st line 50mm and x3 lines 15mm. Link neckline and shoulder on front, use separate to define as cutting line and cut on parallel lines to lengthen to neck and shoulder. Spread pin-tucks and constructed single dart hoods. Overlap on CF is 40mm, close corners. Back yoke and pleats using spread.
Blouse Development
I finished the pattern with seam allowances of 10mm with chain and set the symbols and text.
Front Blouse with Pin-tucks
Blouse with Pin-tucks
Wow -  it’s a great CAD software programme and I’m looking forward to working full time with it. My 5 year plan or dream is to one day be able to afford to buy my own license and work as an independent pattern maker through a studio or pattern making bureau. Fingers crossed the event will find me!


Thursday, 13 June 2013

Boxes 'n Balls

The circle and rectangles menu is located on the main basic menu, and it enables you to make rectangles and half circles. If you need to construct a full circle then you must draw another half or use the mirror function to transform a half circle into a full circle.
Circle Arc
Line tool 10
Separate to make a wedge
The first option selected by clicking, circle arc out of centre point and radius, requires a radius value to be enter into the space below, after that determine the centre point for your semi circle and freehand click direction, a red thread is drawn from the centre point indicating the direction the semicircle will be placed. The second option circle arc out of centre point and periphery point, offers more freedom and doesn’t require a radius value as the size of the semi circle is decided with clicking freehand and subsequent construction of the periphery point and direction it’s placed in.
Circle Tool 10 - create godet
The exercise that I’ve done to practice the interactive Circle 10 tool is to create godet in a skirt and make lovely fish tail panels! Creating the half circles repeatedly in to fashion the godet is a good way to practice the tool. To make the wedge shape at a 35 degree angle I used Line 10 Tool, again repetition helps to solidify the learning.
Finished pattern of Skirt with Godet In-one
Godets are typically triangular wedges of fabric placed into the hem of a skirt, they can also be placed in the hem of the bodice or sleeve. They are sewn between seams or form part of the panel (as I have done in my pattern exercise), creating fullness and flare. They can be used as a single design feature or in a series of several around the hem. Godets may be curved, squared or pointed as a half circle, three-quarter circle or full circle.
Godet from another skirt example
Waistband is constructed using the rectangle out of width and height, I entered the value G4 for width, which generates the waist measurement for the size that you are working in, in this instance N38 (dress size UK 10 or US 8). The extension is 25mm for button, and the height 32mm. Add seam allowances of 10mm with parallel and notches at 50%, 25% and 75% line length. Mirror on fold line to complete the pattern piece and label with center back, center front and grain line.
Waistband
Here are some pockets that are drawn using the rectangle tool.
Pocket and pocket flap
Consolidating the knowledge so far in making a pattern is very satisfying, but also makes me realize how much I don’t know yet! I realize there’s more to discover and so much more to learn.  This basic skirt with an inverted pleat in the center front, pockets in the front side seam and a yoke is a good place to start.

The first thing is to call the basic skirt block, and make the changes needed in order to create a straight skirt. I need to do this because I’m working in the educational version and I can’t save styles and load them, but for me that’s not a problem. I adjust the length, put in ease at the waist and hip, make the hem and side seam straighten up. I also position the blocks so that the side seams are facing each other.

Then I created a development piece in Part Organisation to begin putting in style lines. Dropping a line from the dart point to the hem, then separating the hemline either side of the line. Using transformations and turn from point  to point the hem is spread open. A good idea is to use intersection in the submenu, first determine angle, (which for me is the dart point), second click on the intersection you want to move (which for me is the intersection – dart/waist line closest to the side seam) and third click the intersection where you want your final point to finish at (for me the intersection - dart/waist line closest to the center front). This way the center front line does not move.
Open and spread skirt with transformation
The Yoke is created using the curve line tool, in the submenu for curve construction. Again the depth is optional, I made mine 80mm down the side seam and 125mm down the center front. In the submenu for this tool insert points, direction start / finish and adjustments allow you to achieve the desired style line, remembering to keep a 90 degree angle at the side seam and center back.  

The pocket is also created using the Curve tool. Remember to separate your side seam and the yoke line for setting the pocket mouth value with partial line length, mine is 80mm pocket mouth down side seam, 140mm total pocket length down SS and 60mm along yoke from SS and pocket bag goes to 90mm along yoke from SS. Its then a case of dragging your inserted points using adjustments to make the bag shape.
Pocket and Yoke using Curve
 In Part Organisation I listed the pattern piece to be traced off, using Insert, starting with the skirt front so that I could create the inverted pleat, which was easily done with parallel line tool, to determine the depth of the pleat, in this case I used 50mm, so the finished pleat would be 100mm wide) and then in transformations menu I used click line as mirror line with +copy selected, then it’s just a matter of tidying up overlapping lines with separate and delete tools.
Mirror transformation making the inverted pleat on center front
I finished the pattern with seam allowances using parallel, corners and text, notches and grain lines.
Skirt with yoke and inverted pleat


Wednesday, 22 May 2013

Tool box days - Mastering Grafis

Just as I have folders, boxes and rails of paper and cardboard pattern pieces so are the patterns in Grafis multiplying, so it is important to adopt a good filing method from the get go. The data structure of Grafis is a divided into two areas, one which is administrated by you and one that is administered internally by Grafis. Administered in dialog with you are the Collection Folders, and within those the individual styles. Within the Style the parts (pattern pieces) can be as many as 500 per style, and are named partly by you and given a 3-digit number by Grafis, within each part the information pertaining to Construction record, Points, Lines, Text, Hatching and further Technological information is stored. The pattern piece/part must be named accurately and clearly identify what it is, as it is used in the automatic text function to label the pattern piece on completion.
Grafis records every construction step, I have found this very useful in resetting an exercise to the beginning to repeat and learn other methods or interactive ways of pattern making. For example I want to put a vent into the side seams of a skirt, put 8 buttons down the centre front with an overlap of 40mm for the button stand. I call a basic block, Skirt 20, make changes with Options to make a Straight Skirt and Display measurements. I then trace off the front and back parts into Part Organisation using Insert  and then start on the vent construction and the button stand. At this point in the exercise I take note of the construction steps and click on Test Run, so if I make mistakes during the exercise I can easily reset the steps and begin again. We have also been shown to step through a construction step-by-step by clicking Test Run and S-key together, pressing S-key again to quit. In my opinion, it is important to plan your pattern making and have a clear overview of your construction steps before you begin, to take pencil and paper map it out first so you know where you are going, and what the expected outcome will be. 
Corner Menu
When I lived in Sweden, the first thing I learnt was ‘The Right Hand Rule’, to cross the road and to drive on the right side of the road. This same principle is used in the tools of Grafis. In Grafis the line receives direction and the cursor indicates which direction you must travel along the line in, by imagining that you are driving on a road in right hand traffic the line to be clicked is the central island in the road.  
Link Tool Menu
Sing or Rap, “X to the left! Y to the Sky!”  Grafis uses x-axis and y-axis coordinate system, so very similar to other layout software. With the angle definition beginning from the positive X axis, therefore a positive angle rotation moves anti-clockwise and a negative angle rotation moves clockwise.
It ‘s fun to learn new tools,  the Deleting menu found via Basic menu hosts a variety of deleting options from points and lines to the contents of a rectangle clicked and dragged over what you want to delete.  To create Parallel lines, there is a choice of fixed distance or putting in your own value which must be specified first, there is also the interactive Parallel 10 Tool which is selected first and then the parameters are adjusted.
Parallel Tool Menu

The simple use of the Corner in the Corner menu is a good starting point to practice the right hand principle and to create corners on seam allowances. There are 10 interactive corner options, from Corner 40 with the option of a Curve, Circle and Line. Or the following 7 options for Mirror Corner 10, Mitred Corner 20, Vent Corner 30, Co-ordinated Corner 50, Angle Corner 60, Co-o. angle Corner 70, and finally Hem Corner 80. Go and play with Corners!!
Co-ordinated Corner
The last few lectures have been made up of mastering the easy line functions and really learning these tools. We have covered Linking Lines, Raster, Lengthening and Shortening Lines, Cut, ‘Cut on’ and Separate, as well as the tool - Front Edge 30.
Grafis Support Programs - Front Edge 30

Basically, Linking lines allows 2 separate lines to be joined, click on deposit to complete the link operation.  Lines can be linked in a single or chain; Chain is all tangent (meaning going off on all directions, not to dissimilar to my posts) lines are automatically joined and single is a simpler option, manually select lines and link them. Link with a curve; links 2 lines with a curve between 2 points, it’s used for hemlines, side seams, darts, godets etc. To determine the curve click on the line following the right hand principle at the beginning and end points, only adjust at these fixed points. Curves created with Link 10 Tool can be adjusted more easily, there is a short video demo under the Question Mark ? button for this tool.
Points of the interactive curve follow priorities, so always start adjusting the objects with the highest priority. 1st move Base point – a red dot at the beginning and end of the curve.  2nd move/ adjust Direction handles – shown with a small angle icon at the end of a dotted line. 3rd and 4th shape points are between the 1st base points and are shown with smaller dots, the 3rd shape point being normally situated at 50% or 0mm of the curve. (Some things are better described in a diagram, points being one of them).
Moving swiftly onto Raster:  Raster are the points on a line, dividing the line into sections, the Raster menu offers 4 functions: 0-1-2-4 and an interactive tool Raster 10 tool.
Raster Menu
Raster 0: on a straight line the beginning point and the end point.
Convert to line: resets the sequence of points back to a line.
Raster 1: adds a given number of points to a line an equi-distance apart, including the start and end point. Activate by clicking, then select ‘+/- copy’, set number of points in menu then click required line to be rastered (or in simple terms ‘dotted’).
‘+/- copy’ Appears in many functions; it determines whether a given operation will replace the chosen line, or will be an addition to it. + copy – both line and point sequence are existent, - copy – only point sequence is existent.
Raster 2: points with pre-set distance value are constructed along a line. The pre-set value is an approximation as Grafis corrects the distance and all points including the start and end, divided have the same length/distance. 
Raster 4: distributes a number of points between 2 constructed points. To do this, enter number of points into menu, then click line to be rastered, for start and end point a sub-menu appears.
Raster 10 tool: can be adjusted regarding position and number of points, makes buttons a breeze! Click the tool and select the line that the points are to be spaced along. Double click on the new point sequence and adjust using the follow, 1. distance to base line, (length) 2. number of points or buttons, 3. start of point sequence from beginning of the line, 4. depending on option: point distance or last point distance to base/hem line, 5. angle to base line.
Cut, Cut on, Separate lines… separate lines, divides a line into 2. It is defined in 3 ways, i. Separate or cut at a cutting line; Separate in a corner; Separate or cut freehand by eye. Cut – shortens or lengthens a line up to the intersection, click part of the line you wish to keep and follow the right hand principle. Lengthening is called ‘cutting on’ and is possible to 500mm!

Point, Line and Direction Constructions, and Raster

The Tool Front Edge 30 creates necklines suitable for high collars and revers collar construction,  button stand, with open neckline options and front edge hem designs.  All front edge tool variations require 3 or 4 lines, namely; the neckline; centre front in a continuous line, hemline and a reference point for the revers (which is the breakpoint on a collar construction, a point somewhere on centre front). The tool is found in the call list Grafis Support Programs.

Co-ordinated Angle Corner 70 Tool
Exercise using Jacket front with princess seam using interactive options: front Part 30, parallel for adding seam allowances and hem and finishing with co-ordinated angle corner 70.
I really enjoy working in this program and learning it, these are my own student notes and are not an educational substitute, some of the information might infact be misleading. As I mentioned in previous ramblings, Grafis is very generous with their educational material and free educational download version of the software. Go ahead and challenge yourself to learn it!
More Point Line and Direction Parts

Straight Skirt Grade - point exercise
Using Partial Length to create a back yoke style line

Monday, 13 May 2013

Every scrap used - an exercise in Sustainability.


As they say the stars aligned and all things pointed to ”Sustainability”. Firstly there was a panel from H&M and Simon Collins, Dean of Fashion at Parsons School of Design talking about Sustainability, then there was a book in the library by India Flint called Second Skin that I couldn't put down, and that introduced me to the lovely work of Alabama Chanin, and another library book randomly picked up, brought a chance encounter with another amazing artist Sonia Delaunay. What do these people have in common and where is this all going?

It made me think of recycling, upcycling and rethinking fabric useage and vintage and the Salvo’s, creating work for women in Cambodia, (but that’s another post).

I had a fabulous swing coat pattern that I had been working on, taken  from a coat made roughly 20 years ago in Cape Town, I had lots of off cuts, end pieces and corners that I wanted to use in a reverse appliqué, but appliqué with a sewing machine zig-zag style is so passé, unless you’re a tea towel. To make it unique and valuable Alabama Chanin use mostly hand stitching and organic fabrics in their reverse appliqué work. 


 I also found a beautiful embroidered geometric patterned scarf, made in France 1924-25 by Russian seamstresses for Sonia Delaunay. Russian refugees from Bolshevism who had lost their clientele as a result of the Revolution and had sort refuge in Paris, that fuelled my inspiration.


 I made a stencil, cut it and chalked it up. I didn’t have the time with hand sewn needle work, so I modified my sewing machine to do a “free motion” stitch by raising the presser foot and dropping the feed dog, that way I can sew in all directions and in a free form pattern, which ever way I wish.


So once I had transferred the stencil onto the fabric, I pinned the design in place and started to sew the chalked outline. It is very time consuming, but quicker than hand sewing and gives a lovely effect as the stitch size is not uniform, but lengthens and shortens as you pull and push the fabric around. The direction of the sewn stitch line is also softer and more organic as it falters along its chalk path. 
The layout of the design onto the pattern piece of the shawl style collar.

Chalking it up, next time I might use a dusting technique I'v e seen used in India for marking up beadwork, it reminded me of my grandmothers powder puff that she used for her face powder.

cutting, clipping and snipping out the design.

The finished swing coat.


The end.