Dictionary Definition 1. a change or
alteration, 2. the act of transforming, 3.
(Mathematics) a change in position or direction of the reference axes in a
coordinate system without an alteration in their relative angle. 4. reflection,
5. rotation.
This is what I do as a pattern maker, I take
a flat expressionless piece of paper or fabric and transform it into something wearable, useful and hopefully beautiful …therefore a very important section in the Grafis
toolbox is aptly called Transformation.
The Transformation menu is divided into 5
sections, the top 4 button divisions are transformational functions; Move,
Turn, Scale and Mirror. The bottom set of buttons is the control area, you will
recognize from other menus, i.e. +/-
copy lines points and parts buttons and reset, as well as a transformation
list.
Move: before you read on I want
you to sing: “X to the left, Y to the Sky”. Very good.
Moving a point, line or part by direction x
(horizontal) and direction y (vertical). This involves entering a known X axis value (dx) and a y axis value. The
values can be positive or negative they will move accordingly.
Direction X =
millimeter value (+/-) Object will move...
← dx = -
mm value to the
left
← dx = +
mm value to the
right
↓ dy = -
mm value downwards
↑ dy = +
mm value upwards
To demonstrate this I simply moved the shoulder and armhole line of
Bodice 10 by dx= +200 and dy= -50. First enter the value, select the lines and
transform objects with +/- copy and line, activate points and move those now
to.
 |
| Move shoulder |
Still in the Move section of buttons, you will find move from Point
to Point. After checking set points the starting point and the final point can
then be determined and the connecting lines be transformed between them. The
exercise for this is to move the front armhole to the back armhole from the
underarm side seam point.
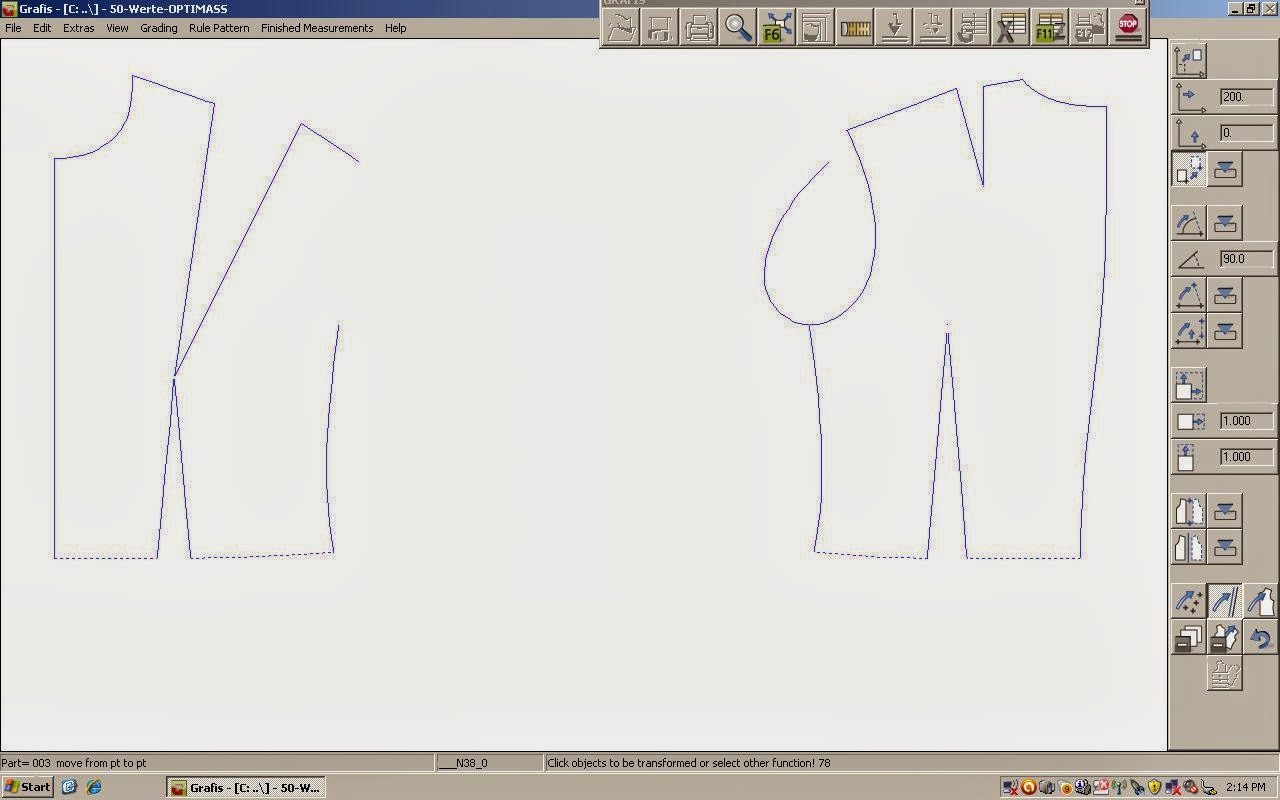 |
| Move from point to point |
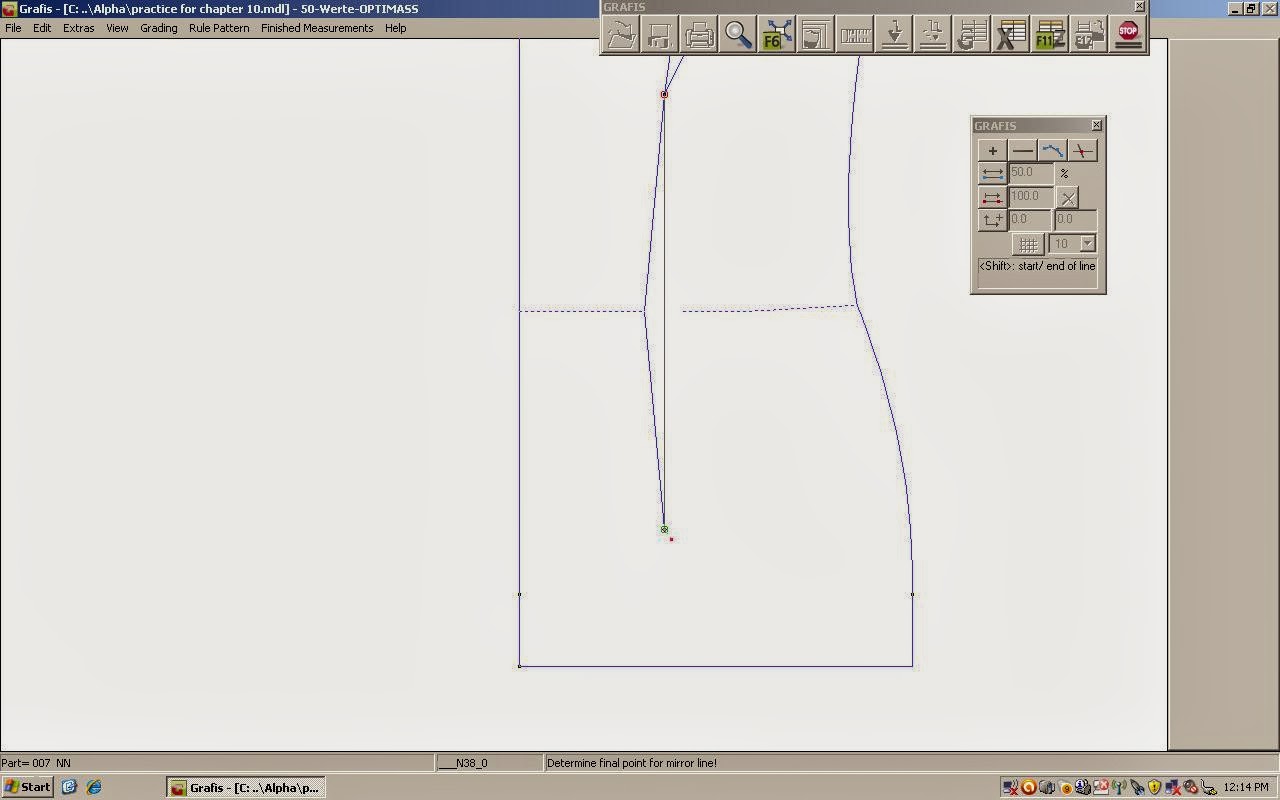
Turn: Now sing Bonnie Tylers – Total Eclipse of the Heart lyrics, which
for those of you who have forgotten or were born in the 90’s goes something
like this, “turn around bright eyes, every now and then I fall apart”. Very
good.
Turn with … turning point and angle, the objects are rotated around
a given pivot point by a given angle. If it is a dart that you are going to
manipulate in this way, then you have to measure the angle with your
ruler/measure tool and make a note of it, as you can enter the value in the
turn angle box. It must be noted that the angle remains constant throughout a
grade size table; therefore all sizes will have the same angle on the dart. To
exercise this I moved the shoulder dart which I measured at 15.8 degrees into
the side seam. First I drew in an auxiliary line with the line tool 10 and then
separated the side seam at the auxiliary line intersection. I also linked the
side seam line segments above the auxiliary line, to make it easier to move with
just one click. Once you’ve enter the turn angle, you select the turn angle (in
this instance the bust point). The activate line and select lines to be
transformed, don’t forget to do your points to, and apply +copy to draw in new
side seam dart line.
 |
| Turn point and angle |
Turn and Move: Ok I don’t have a song for this one, but this is a
very cool operation, be warned this move can make you a little dizzy.
Turn and move with four points is what the button is called and it’s
the last in the turn section of the Transformation menu. Objects are moved and
rotated in one operation, you have to work out which 4 points must be clicked
and in what order to execute the operation. The move vector is defined by
starting and final points, which are your odd number clicks i.e. 1 and 3. Your
turn vector/rotation angle is determined by the start point and final point,
which is your even number clicks i.e. 2 and 4.
To exercise this call Bodice 10, prepare it in the shoulder area to
have a yoke designed onto the front and back. By relocating the front shoulder
dart into the side seam, drawing in the auxiliary line, using Line Tool 10,
from the apex of the front dart bust point to the side seam and separate the
side seam where it intersects. Use Transformation - Turn with turn point and angle to move the dart
into its new location. For the back use the same steps as above but into the
back armhole and draw in the back yoke style line from the new dart position to
the centre back.
The desired result is that the back yoke will turn and move onto the
front shoulder line. Click turn and move button.
1st click determine start point of Move vector = Back Shoulder Point
(1)
2nd click determine start point of Turn vector = Back
Neckline at Shoulder line (2)
3rd click determine final point of Move vector = Front
Shoulder Point (3)
4th click determine final point of Turn vector = Front
Neckline at Shoulder line (4)
 |
| Turn and move |
Scale: Totally out of songs now.
The objects are reduced and increased relative to absolute zero
(1.00 = 100% therefore 1.10 = 10% increase in size). Scale value in X direction (fx) applies only
to the X component of the object in the construction. Scale value in Y
direction (fy) applies then only to the Y component. The scalability of the pattern piece is used
for stretching or shrinking it according to the design criteria or fabric
specifications. For example if you are using a stretchy material with lots of
lyrca/elastine etc or a jersey knit. It might also be used for a lining in a
woven fabric (in which case it would be increased in fx and decreased fy) or
Under Collar pattern piece or a fusing piece (decreased). It could also be
useful in calculating shrinkage and adjusting pattern pieces accordingly
(wouldn’t that be nice). Read through the following table to see how it works.
FX
|
=
|
FY
|
=
|
1.00
|
No Change in
Scale
|
|
FX
|
=
|
1.10
|
FY
|
=
|
1.00
|
Stretching of
pattern 10% horizontal direction*
|
FX
|
=
|
FY
|
=
|
0.90
|
Shrinking by
10% in all directions
|
|
FX
|
=
|
FY
|
=
|
0.5
|
Halves the
dimension of the construction
|
|
FX
|
=
|
FY
|
=
|
2
|
Doubles the
dimension of the construction
|
*Different values in FX and FY distort the width and height.
Mirror is the next section on the Transformation menu and there are
2 options. Firstly, Mirror at two points or alternatively Mirror at a line.
Mirror at 2 Points: Does exactly this. Select the points or create
them and then select the function button and then mirror with copy+/- lines and
points between the mirror points. Easy!
 |
| Mirror at 2 points |
Mirror at a Line: Objects are mirrored at
an existing line of the construction.
 |
| Mirror at a line |
September has been a month of change for me
also on a more personal level and there has been a fair amout of
transformations in my life. I’ll be moving into a new house next week, so the
studio has been packed and I’m currently writing this from my laptop on the
kitchen counter with about 60 packed tea chests behind me. My husband escaped
this move by leaving for Europe on a 5 week business trip (not his choice, it
just happened like that). But I’m not on my own I have my wonderful family to
lend a helping hand, babysit, cook a meal and be a shoulder to lean on. It also helps that I’m moving into a fabulous
house with lots of entertainment space and a huge studio room for
my cutting table and computer desk! Hooray, I’ll be back in October to practice
more Grafis and learn the construction parameter x value. I can hardly wait!